The Secret Guide To Virtualization Obfuscation In JavaScript
in Posts / Obfuscation
Well, now that I posted it, it’s not really a secret anymore. But you might enjoy it anyways.
In this blog post, I am going to introduce you to the basics of virtualization obfuscation in JS and how to design an instruction-set to make it all work. This post is inspired by my recent GitHub project Rusty JSYC where I built a compiler and VM for virtualization obfuscation.
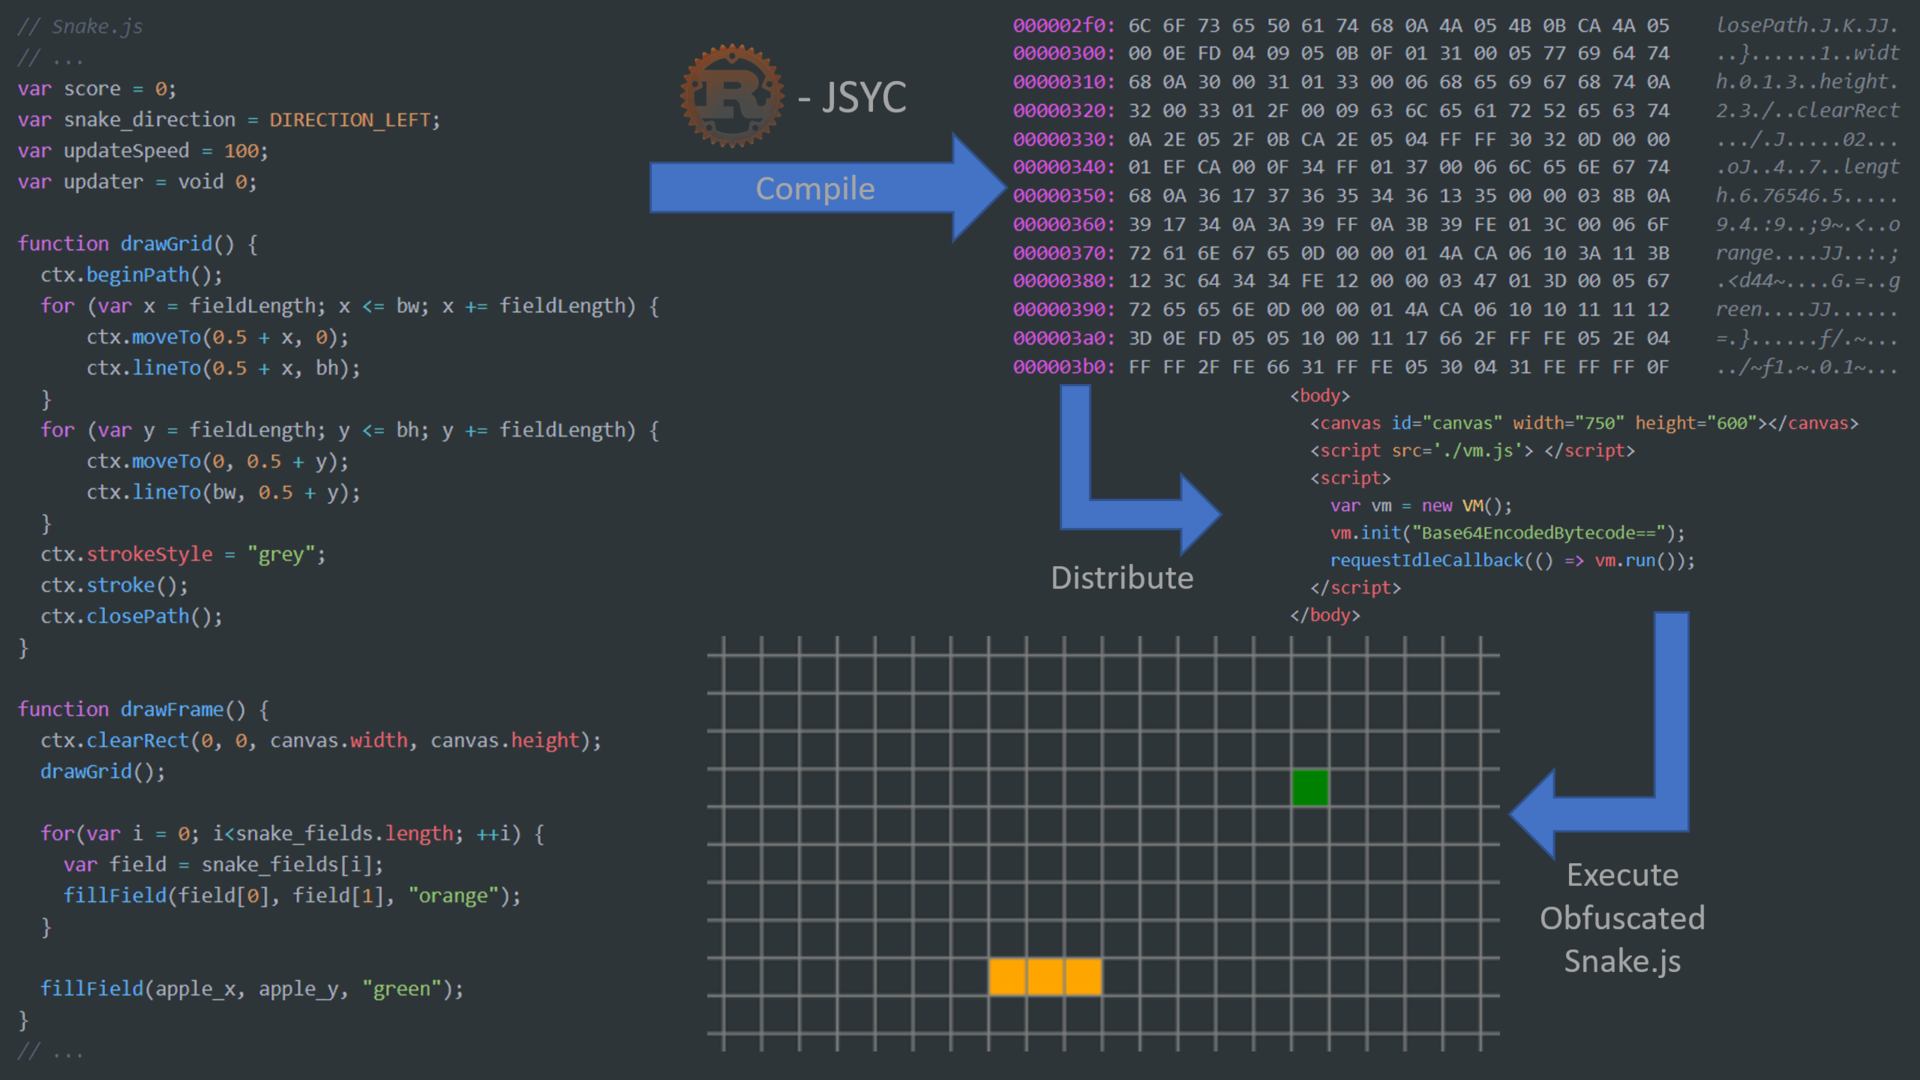 Code execution with virtualization obfuscation
What is virtualization obfuscation?
Virtualization obfuscation is a state-of-the-art obfuscation scheme. It obfuscates the code by compiling it into bytecode which is then executed by a virtual machine (VM). Thus, the VM gets distributed along with the compiled bytecode. It is then called with this bytecode and executes it and is thereby executing the actual code.
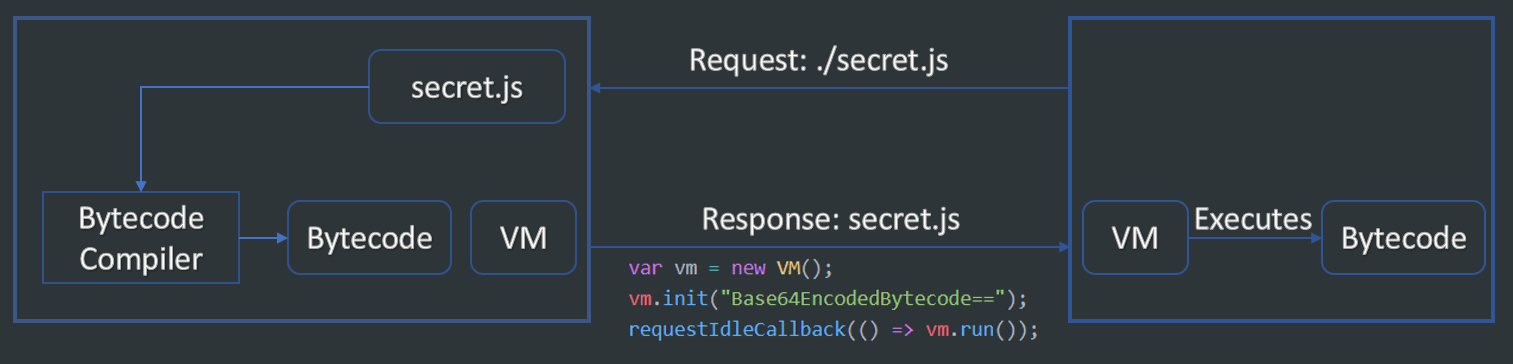 A showcase on how to deploy virtualization obfuscation
Since the bytecode is executed instruction by instruction, the original code is never restored anywhere. So, any potential attacker must first reverse engineer the VM, which may be heavily obfuscated. One must then understand the underlying architecture and instruction-set before being able to analyze the actual bytecode.
Since any two virtualization obfuscations are potentially different, the use of automated tools is limited. [1], [2].
Constructing an instruction set
Before building either VM or bytecode, you must think about how both are designed. There are many different architectures. Get inspired by them or, even better, come up with something new and exotic. You want people to NOT understand it. So, make it complicated and nasty.
LoadNum Reg(0)  ShortNum(10)          // var a = 10;
LoadNum Reg(1)  ShortNum(100)         // var b = 100;
Add     Reg(2)  Reg(1)        Reg(0)  // var c = a + b;
An example how Rusty-JSYC’s disassembled bytecode looks like
The instruction set for Rusty-JSYC is based on registers and a text/data-segment which is the bytecode itself. This segment is a sequence of operations.
- Sequence of operations
- Operations have an instruction + operands
- Instruction: one-byte operation code (op code), i.e.:
ADDorLOAD_STRING - Instructions have a predefined set of operands
- Operands represent strings, numbers, arrays or registers
Building a virtual machine
This sounds a lot more horrifying than it actually is. Trust me.
The VM in Rusty-JSYC mainly contains a registers list, an operation array and the bytecode. Further there is a bytecode pointer that always points to the next byte in the bytecode. This pointer is stored in a register. And gets increment whenever vm.getByte() is called.
Initialization Before the execution starts, everything must get initialized. The operations array gets initialized with all required operations. The registers array gets initialized with the dependencies of the bytecode. Every JavaScript code has dependencies, like window, document or setInterval, in the real JavaScript context they are provided. However, they must be explicitly provided for the virtual context.
The Rusty-JSYC compiler automatically provided a list of dependencies
// this.ops[...] = function(vm) {...}
// ...
init(bytecode) {
  // Init the bytecode
  this.bytecode = this._decodeBytecode(bytecode); // Base64 decode
  this.setReg(REGS.BYTECODE_PTR, 0);

  // Init dependencies
  this.setReg(10, window);
  this.setReg(11, document);
  this.setReg(12, setInterval);
  // ...
}
After the VM and thus the virtual context is initialized we can proceed to actually turning it on.
Execution The bytecode execution starts by fetching the first byte from the bytecode. It is then interpreted as op code. For example, the value 101 stands for the ADD-operations. Based on this, the corresponding virtual instruction handler is fetched.
// this.ops[101] = function(vm) { ... }
// ...
run() {
  while(this.regs[REGS.BYTECODE_PTR] < this.bytecode.length) {
    var op = this.ops[this.getByte()];
    op(this);
  }
}
All instructions in this virtual machine are accessed by virtual instruction handlers. These are just functions that are called, which then perform the actual operation. For example, the virtual instruction handler for the ADD-operation looks like this:
// const OP = { ADD: 101 }
// ...
this.ops[OP.ADD] = function(vm) {
  var dst = vm.getByte(), src0 = vm.getByte(), src1 = vm.getByte();
  vm.setReg(dst, vm.getReg(src0) + vm.getReg(src1));
}
The vm.getByte() function fetches the next byte of the bytecode. Thus, the first byte of the ADD-operation is interpreted as destination register. The next two bytes are interpreted as source registers. These get summed up and stored in dst. This way the operation fetches it’s three operands on its own.
Afterwards, the main loop fetches the next op code, decodes it to an instruction handler and executes it again. And so on…
Using atomic building blocks
Since it is often useful to keep the instruction set simple but powerful, it makes sense to support only atomic operations. These are operations that cannot be split further, such as property access (obj[index] or obj.prop), add (a+b) or a function call (func(arg0, arg1)).
Consider you have the following JavaScript code:
var a = "Hello";
var b = " World";
console.log(a + b);
This can be expressed in atomic operations as follows:
var a = "Hello";
var b = " World";
var log_str = "log";
var console_log = console[log_str];
var a_plus_b = a + b;
var _ = console_log.apply(console, [a_plus_b]);
Let’s go through it. The first two operations remain untouched. After that, the compiler.log expressions gets reexpressed as compiler["log"]. This way you can access the property log and use it as well as for expressions like array[index]. The log-function is then stored in console_log.
The last line calls the function. The apply function in JS is somewhat special as it allows to pass an this-pointer and a list of arguments to a function call. This is important as the log function must have a this pointer to the console object.
Performance considerations
Of course, having only atomic operations can hurt performance in some cases. Although I found this approach sufficient for most purposes. But you can of course define more complex instructions, specifically for your purposes.
Consider a game with collision detection, which usually contains formulas to calculate distances. These can become pretty resource hungry when called hundreds of times a second in the virtual context. So, you may consider making this a dedicated instruction. It is likely not surprising that this formula is in your code. Therefore, you might as well reveal it for a serious performance boost.
Dealing with more special operations
While simple operations that only modify registers are not too complicated, it gets more difficult when dealing with jumps and function calls.
Jumps
On the JS side a jump really only sets the bytecode pointer, which points to the next byte to be fetched by vm.getByte(). It is stored in a register which enables easy access.
this.ops[OP.JUMP] = function(vm) {
  var offset = vm._loadLongNum();
  vm.setReg(REGS.BYTECODE_PTR, offset);
}
The magic here lies in the offset which must be calculated by the compiler creating the bytecode. Thus, this topic will be treated again when I show you how to design the compiler.
Bytecode Functions
Bytecode functions need a lot more consideration. You have to get to the function and back to the point from where it was called. Arguments must be passed, return values must get processed and functions can interact with variables defined outside their scope. Further, they can declare new or overwrite existing variables, but these changes may only affect the function’s scope.
Think of the following example:
var x = 100; // Scope 0
function func(a, b) {
  x = 10; // x from Scope 0
  var x = 50; // Now in Scope 1
  function func_inner(a) {
    return a+x; // a from Scope 2, x from Scope 1
  }
  // x from scope 1
  return func_inner(x);
}
// x from scope 0
var x = func(x, 10);
A lot of things to keep in mind, right?
One approach to implement functions is based on backing up the entire register state before entering the function and restoring it when leaving. Thus, after leaving the function, all registers (including the bytecode pointer) are restored and no changes made by the function are carried over. Here it is again useful to have the bytecode pointer and other special purpose values stored in registers. So that you do not have to worry about them separately.
However, you obviously do want functions to make changes to the registers through a return value or modification of outer-scope variables. Thus, you can except some registers from being restored. This way only these registers will carry over changes.
this.ops[OP.CALL_BCFUNC] = function(vm) {
  var funcOffset = vm._loadLongNum(); // The address of the function
  var returnReg = vm.getByte(); // Save the return register for later

  // Registers backup
  vm.reg_backups.push([vm.regs.slice(), returnReg]);

  // Provide function arguments
  var argsArray = vm._loadRegistersArray();
  for(let i = 0; i < argsArray.length; i+=2) {
    vm.setReg(argsArray[i], vm.getReg(argsArray[i+1]));
  }

  // Jump to the start of the function
  vm.setReg(REGS.BYTECODE_PTR, funcOffset);
}
The funcOffset contains the address of the function in the bytecode. The returnReg is later used in the RETURN operation to move the function’s return value to the right register. argsArray contains an array of pairs. Each pair’s first element describes where a function argument must be moved to and the second describes where it currently resides.
this.ops[OP.RETURN_BCFUNC] = function(vm) {
  var returnFromReg = vm.getByte(); // The return value's register
  var exceptedRegs = vm._loadRegistersArray();

  // Retrieve the registers backup
  var returnData = vm.reg_backups.pop();
  var regBackups = returnData[0];
  let returnToReg = returnData[1];

  // Copy the return value to the register where it is expected
  regBackups[returnToReg] = vm.getReg(returnFromReg);

  // Exempt some register from being restored
  for(let exceptedReg of vm.modified_regs) {
    regBackups[exceptedReg] = vm.getReg(exceptedReg);
  }

  vm.regs = regBackups; // Restore registers (with exceptions)
}
The RETURN-operation retrieves the previously backed-up register state. This backup-state is then modified to carry over modifications. Finally, the current register state is overwritten with the restored one.
This way a function can use all available registers while not corrupting the register state from code prior or after the function call.
Bytecode function callbacks
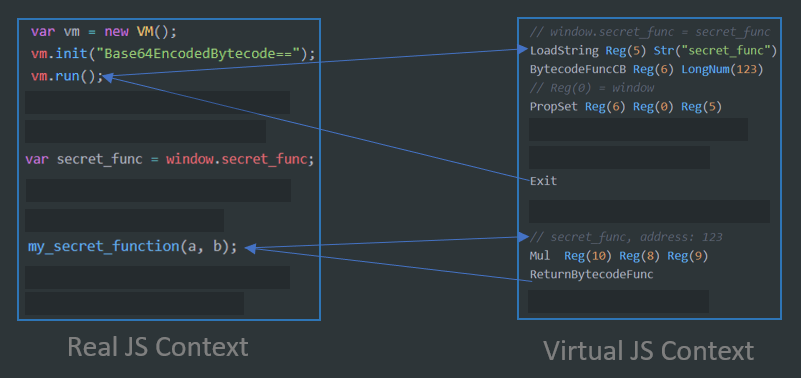 A visualization on virtual function callbacks
One crucial thing for JS are callbacks. You likely want to have callbacks on bytecode functions, i.e. to implement obfuscated event handlers. The following operations store a function that calls a bytecode function.
this.ops[OP.BCFUNC_CALLBACK] = function(vm) {
  var dst = vm.getByte();
  var func_offset = vm._loadLongNum();
  var arg_regs = vm._loadRegistersArray();

  vm.setReg(dst, function() {
    // Copy the function's argument to the expected register
    for(let i = 0; i<arg_regs.length; ++i) {
      vm.setReg(arg_regs[i], arguments[i]);
    }
    vm.runAt(func_offset)
  });
}
The function expression is assigned to the dst register. This can then for example be used as an argument to document.addEventListener(...).
This way you can even define functions that can be called from the real JS context (or other virtual contexts) and executed in the virtual context.
// Compiled JavaScript
function secret_function(a, b) { return a*b; }
// Assign the bytecode function handle
window.secret_function = secret_function;
// Non-Compiled JS or other compiled JS
var secret_function = window.secret_function;
// This calls the bytecode function
secret_function(a, b);
So what’s left?
So far, I showed you some concepts on how to design an instruction set and the corresponding virtual machine. Keep in mind, that others should not understand what you’ve built. So using the same architecture as in an public post is likely not the best idea.
However, the most important part is still not covered: the compiler. Stay tuned for my next blog post or check my compiler out on your own.
Sources
- [1]R. Rolles, “Unpacking Virtualization Obfuscators,” USENIX Workshop on Offensive Technologies (WOOT), 2009 [Online]. Available at: http://static.usenix.org/event/woot09/tech/full_papers/rolles.pdf
- [2]J. Kinder, “Towards Static Analysis of Virtualization-Obfuscated Binaries,” Reverse Engineering (WCRE), 2012 19th Working Conference, Oct. 2012 [Online]. Available at: https://dslab.epfl.ch/pubs/staticVirtObf.pdf